Hey everyone!
We are the 6 sisters over at
Yes, we have always been known for our junk so now we are acting on that and getting creative with our everyday junk in our trunks! We are everyday women and moms who go through everyday experiences...some good, some bad, some fun, some embarrassing. We share it all with you! We show off crafts, DIY projects, recipes, FREE printables, funny stories of parenting, and many more. Come stop by and follow us, we would love to have you along for our journey!
Today we are sharing a DIY stick horse with you:

About a month ago I was walking around a craft show and saw these adorable stick horses for sale. Not wanting to spend my money on them (I had a particular booth I had pegged for all my cash :) I decided to make my own.
The great thing about these horses is that they can be made with items you already have at your house and they will be a GUARANTEE hit with the kiddos. And they can be customized to meet your kids individual personalities. Oh and did I mention they are super easy, fast and cheap to make?
Here are the 2 different versions Tenille and Liesl made. One is perfect for a little girl and the other is perfect for that little boy in your life. Use these ideas to make your own perfect little stick horse.
Here are the 2 different versions Tenille and Liesl made. One is perfect for a little girl and the other is perfect for that little boy in your life. Use these ideas to make your own perfect little stick horse.
[Tenille's version]
Supplies needed:
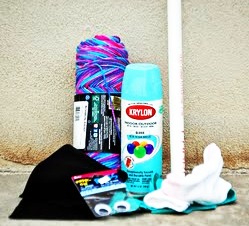
- PVC pipe (mine were 3 feet long)
- Spray Paint (optional)
- Yarn
- Googly eyes
- Felt
- Hot glue gun and sticks
- Large needle
- Sock with colored tip
- Batting to stuff sock
I spent a total of $3 on this project...here's the breakdown on the supply costs.
- $1.79 for 10 feet of PVC pipe which I had cut into (3) 3 feet sections so thats $.60 cents for 1.
- $3.49 for yarn (I used hardly any of it. I could probably make 15 more horses with my leftover yarn so lets estimate $1 for yarn even though that's estimating high)
- $.39 for googly eyes
- $.39 for felt
- $1 for a pair of color tipped socks (really we should put $.50 since you only need one)
- $0 for spray paint that I already had
- $0 for stuffing...I just ripped up an old pillow and used that for my stuffing
Here are the steps to making your own stick (or PVC) horse.
First is to get your PVC pipe cut. I made mine 3 feet long but by all means do any size you want. I just bought my PVC pipe at a local hardware store and it came in a 10 foot piece. They cut the pipe into (3) 3 feet lengths.
[The next step is optional. I didn't want my stick horse to have a white stick so I opted to spray paint mine. I just happened to have some Blue Ocean Breeze spray paint laying around so I gave a few coats of paint to give it that cute color.]
After getting your PVC ready you will next take your sock and start stuffing it. Stuff away, ladies. Like I mentioned earlier I couldn't find batting so I just ripped open an old pillow and dug to my hearts content. I will admit that I think I stuffed it too much. I wish I had given it a little more give but we live and learn.
After stuffing the sock you will next take the sock and place it over the PVC pipe. Make sure to push it so the head doesn't bob around too much.
Next I fold the sock up a little and put hot glue up near the top of the PVC pipe and then fold the sock over it. Make sure to gather the sock up towards the back of the PVC pipe
Next you will take your yarn and start wrapping it around the base of where the sock and PVC pipe meet up. [I like to put a little hot glue and glue a little section and then start twisting it around. Make sure you wrap it tight and that each strand is right next to the other. When you get to the end I just tucked the strand into the row below and then took a little tacky glue and place a dab on top of it to better secure it.]

This is how it will look after you finish wrapping. I left the bottom piece uncovered but you could cover it if you wanted to.
Next step is to make the horses face. Take your felt and make 2 small circles (the nostrils), 2 bigger ovals/cirlces (eyes), and 2 heart shapes (ears). The great thing about this is you don't need to be perfect. In fact my circles and hearts are so awful I think my 4 year old could of cut them better.
I started by gluing the small circles (nostrils) right where the color starts on the sock (slightly above). Then I hot glue the googly eyes onto the oval/circle felt pieces and then hot glue them onto the sock. I then put a dab of hot glue on one side of the top of the heart (bottom left picture) and then press the tops together (bottom right picture). Basically the bottom point of the heart will become the tip of the ear. After gluing the heart together you will then put another small dab of hot glue on the bottom part of the glued ear and then glue it onto the sock wherever you want.

Here is how my horsies face looked:

The last step is to put the horses mane in. I cut my yarn in 10 inch strips (again go as long or as short as you want). Next you will take those strips and thread them through the top part of your sock. I started on the colored part (the heel of the sock) and worked my way down. I found that the more strands you could get in each stitch the better it looked. 4 is the preferrable amount for me. Once it is threaded through you then do a fancy double knot.

And you will continue doing this all the way down the back of the sock.

The very last step is to let your kids enjoy it.
While I made it for my sweet 11 month old daughter, my two older boys sure had fun playing with it. I guess I will have to go buy some camo yarn and green paint and make them their own individual ones.
Hey everyone this is Liesl now. After seeing Tenille's idea of making her own stick horse I knew I wanted to make one too:

For mine I just spray painted an old broom stick I had laying out in the backyard. Used one of my old socks and decided to use some extra jean material for the ears that I had from when I cut some pants into shorts. I just cut 4 pieces and then washed them so they would look more frayed at the ends and then superglued them together so the front and back looked the same. Then I just glued it on to the sock. I also added a reign to mine with a scrap piece of leather. It wasn't long enough to make it all fancy so I just tied a knot around the nose and another at the end.

I then started to tie the yarn in for the mane like Tenille did. I opted for the thicker yarn so I wouldn't have to do as much work. As I was working on it I kept looking at my horse and thinking something was weird about it. So I would keep putting more yarn in to see if that helped.
Finally I asked my husband (who is a country boy) what he thought of my horse and he replied with, "it looks like a Bob Marley Reggae horse".

He then proceeded to show me that horses wear their hair only to one side with a little hanging in front. Ha ha what would I do without my cowboy husband ;) That's all my horse needed to look normal!
I love how it turned out and was so fun to make. The best part is how easy and creative you can be with it. Feel free to pin this! ;)
Come visit anytime,

Stinkin cute. Looks easy enough for me to make =)
ReplyDeleteThat is such a sweet idea!
ReplyDeleteGreat project! You girls always have such creative guest bloggers!
ReplyDeletePerfect for a kids craft! Love the different versions- thanks for sharing!
ReplyDelete:-)Monicka